top_menu – Page 10 – jozefmares.com
Home top_menu
Category:

top_menu

I recently have “honour” to be a part of the team which mitigated SYN flood attack to Czech news sites (of course not all, but one of the greatest and best). :)

You can read more about issue here in English or here in Czech.

Technical details about attack are now part of the investigation but basically this was form of a SYN flood based DDoS originating from Russia (we know it now, but we did not knew before). There were spoofed headers so it looked like traffic is going from many locations (e.g. Switzerland).

So, first and very brutal method is to block international traffic – you should consult this with upstream provider. It is always better for effectiveness to blackhole traffic on upstream routers. Unfortunately this helped only during phase one of attack.

But let’s dig deeper into a problem. How does this attack is created and realized?

I will use GNU/Linux based examples as I’m much better with this OS than with MS Windows. But concept applies to almost every OS.

SYN flood is based on resource exhaustion on target system (well, every DoS or DDoS is based on this concept).

Attacker achieves this by abusing thing called three way handshake, which means in normal conditions:

1. the client requests a connection by sending a SYN (synchronize) message to the server;
2. the server acknowledges this request by sending SYN-ACK back to the client;
3. the client responds with an ACK, and the connection is established.

This is kind a core of TCP communication (and I took it from Wikipedia).

A SYN flood attack works by not responding to the server with the expected ACK code. The malicious client can either simply not send the expected ACK, or by spoofing the source IP address in the SYN, causing the server to send the SYN-ACK to a falsified IP address – which will not send an ACK because it “knows” that it never sent a SYN. (this is from Wikipedia too, you can try to read it by yourself

There are a few countermeasures you can implement on your GNU/Linux box:

1. enable SYN cookies (this works on FreeBSD too):

echo 1 > /proc/sys/net/ipv4/tcp_syncookies

2. check how many entries you have in your conntrack table:

cat /proc/sys/net/ipv4/netfilter/ip_conntrack_count

3. check how much entries can be stored in your conntrack table:

cat /proc/sys/net/ipv4/netfilter/ip_conntrack_max

4. if you are lucky and you have dedicated GNU/Linux firewall you can adjust number of conntrack entries.

Basic formula: CONNTRACK_MAX = RAMSIZE (in bytes) / 16384 / (X / 32) where X is your number of bits in pointer (yes, it is 32 or 64 for most systems).

5. modify number of buckets in hash table. You can find it in:

cat /proc/sys/net/ipv4/netfilter/ip_conntrack_buckets

which is only read only alias for module parameters in:

cat /sys/module/ip_conntrack/parameters/hashsize

Formula for hashsize is: CONNTRACK_MAX = HASHSIZE * 8.

6. disable conntrack for certain destination IP and port

iptables -t raw -A PREROUTING -d <server IP> -p tcp --dport 80 -j NOTRACK
iptables -t raw -A PREROUTING -s <server IP> -p tcp --sport 80 -j NOTRACK

I did not knew that there is this option and I could not switch conntrack completely off because I needed to do NAT (oh how I hate it) to keep production on-line.

During peak of the attack conntrack table has this kind of growth (there are some stupidities in graph as we have been adjusting settings without changing monitoring):conntrack peak
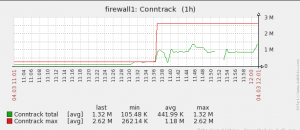
After communication with upstream provider, and with tuning of conntrack (especially disabling for HTTP traffic) problem was gone.

By the way, this kind of attack is pretty lame, and for media at all: this is not a hacking attack. You can’t spot real hack. ;)

I manage multiple certificate authorities – two are for my company, three are for customers, one is my personal and so on. I run certificate authorities because I do not like feeling dependant on companies with stupid security policies like commercial certificate companies. It my sound like I hate these companies but I only consider them as pure security evil (yet, I still must use them). :)

If you are asking, why you should manage your own certificate authority consider things like very own VPN server (based on OpenVPN or IPSEC), securing your sites and applications like OwnCloud or SOGo, signing emails (yes, you can do it with GPG) and so on. x509 standard is good – implementation and realisation is really bad.

So, if I do not want go usual way I need to manage CA on my own. I just to use TinyCA2 which seems to be dead, and I’m on OS X now so TinyCA2 did not fit to my system and workflow. Thank you for your service, but it is time to move to new home dear TinyCA2.

I found few other options like OpenVPN easy-rsa, some shell-hacked-ultimate-wrappers on Github, huge projects like OpenCA and so on. I even tried to use certificate helper integrated in Keychain Access on OS X.

Results:

* Keychain Access is good for generating certificate request for user, but sucks on CA management;
* OpenCA is way to big for me;
* easy-rsa and shell-hacked-ultimate-wrappers seemed to be solution, yet I do not like it;

Bummer.

Then I started to google around again and I realised I totally missed XCA project. After installation I really did not liked user interface, but it is just about habit. TinyCA2 UI was just different, you have to get used to new software (and is good if you know how certificates work – it will help :) ).

I did not made migration of old CA’s to new system as I’m waiting ’till certificates will expire and then I will migrate users to new standard with 4096 bit long keys.

What else you should know about this software?
* XCA stores whole CA in single file with suffix xdb;
* has pretty decent UI with glitches but I can survive them;
* supports whole subset of formats like DER, PEM, PFX and so on;
* allows you to sign external requests – I needed this;
* supports revocation lists – with little bit scripting you can automate it;
* has templates – I hate to fill forms again and again with same informations;
* has pretty good documentation;

Hope this software will stay with me as long as TinyCA2.

Recently, I felt in love with Homebrew as it is far better way to manage apps then Fink and Ports I used before.

I want to manage my Homebrew apps with Puppet and this is how I’m doing it.

Some research before coding and found this Homebrew module on github.

Install module wherever you want (depends on setup type – are you standalone or client/server driven?) and we are going to configure it.

I renamed module to osx-homebrew as I want every OS X specific modules visible by simple ls. So, where I type osx-homebrew you will have plain homebrew.

I have now for testing one Puppet master in virtual machine (this workflow will change soon) thus I installed module to $puppet_dir/modules on my master.

In node definition file (in my case only site.pp for now) configuration looks like this:

node 'hack-pro' {
class { 'osx-homebrew':
user  => 'jozef',
}

$pkglist = ['detox', 'nmap', 'git']

package { $pkglist:
ensure   => installed,
provider => brew,
require  => Class['osx-homebrew']
}
}

After test run I found one error:

Error: Could not prefetch package provider 'brew': Could not list packages: Execution of '/usr/local/bin/brew list --versions' returned 1: /System/Library/Frameworks/Ruby.framework/Versions/1.8/usr/lib/ruby/1.8/pathname.rb:853:in `expand_path': couldn't find HOME environment -- expanding `~/Library/Caches/Homebrew' (ArgumentError)
from /System/Library/Frameworks/Ruby.framework/Versions/1.8/usr/lib/ruby/1.8/pathname.rb:853:in `expand_path'
from /usr/local/Library/Homebrew/global.rb:22:in `cache'
from /usr/local/Library/Homebrew/global.rb:41
from /usr/local/Library/brew.rb:18:in `require'
from /usr/local/Library/brew.rb:18

Unfortunately this error comes from changes in Puppet 3.X – there was introduced change where Puppet stripes $HOME variable.

You can find hotfix here.

Download it on Puppet master (in my case, find your own install path) to:

wget https://raw.github.com/nanliu/puppet-homebrew/89e5eb7408b13a87f2d229e3b023deca835201d8/lib/puppet/provider/package/homebrew.rb -O ./modules/osx-homebrew/lib/puppet/provider/package/homebrew.rb

In next run on Puppet client you will spot this:

[jozef @ hack-pro ~]$ puppet agent -t
Info: Retrieving plugin
Info: Loading facts in /Users/jozef/.puppet/var/lib/facter/has_compiler.rb
Info: Caching catalog for prg1
Info: Applying configuration version '1361584588'
Notice: /Stage[main]//Node[prg1]/Package[git]/ensure: created
Notice: /Stage[main]//Node[prg1]/Package[nmap]/ensure: created

Win!

One warning: this approach assumes you have compiler installed. If you are compiler-free you can install it with osx-homebrew module:

class { 'homebrew':
command_line_tools_package => 'command_line_tools_for_xcode_os_x_lion_aug_2012.dmg',
command_line_tools_source  => 'http://puppet/command_line_tools_for_xcode_os_x_lion_aug_2012',
}

You should notice that you must have command line tools pre-downloaded as Apple requires Apple ID to download them.

Automation of DMG files install and download security will be covered in some of next posts, for now you are on your own. :)